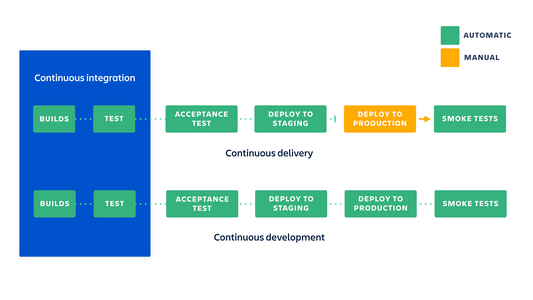
Devops is the integration of development and operations team which focuses on continuous testing, continuous automation, ongoing workflow, with quicker delivery and ability to deploy secure applications and robust pipelines. It is achieved by implementing practices of Continuous Delivery as a control structure for achieving quality software applications that are in line with the compliance policies.
CI/CD enables organization to grow team, code-base, and infrastructure. It removes the challenges associated with deploying changes to production. By automating the building, testing and deployment phases of your pipeline you remove any form of gate-keeping and make deploying to production a non-event.
It encourages each team member to own their code throughout its entire life-cycle (not just until it's merged into master), as well as small iterative changes rather than huge features that have been brewing a very long time.
Continuous Integration (CI) is a software engineering practice in which developers integrate code into a shared repository several times a day in order to obtain rapid feedback of the feasibility of that code. CI enables automated build and testing so that teams can rapidly work on a single project together.
Continuous delivery (CD) is a software engineering practice in which teams develop, build, test, and release software in short cycles. It depends on automation at every stage so that cycles can be both quick and reliable.
Continuous Deployment is the process by which qualified changes in software code or architecture are deployed to production as soon as they are ready and without human intervention.
Tools and Downloads (Prerequisites)
In order to get your development environment properly configured you'll need to be running a version of Windows that is supported by Docker for Windows and have the following tooling installed:
· Visual Studio 2017 Professional with MSDN
· Git Bash Editor to run Docker command (Docker-machine, Docker-compose etc.)
· Visual Studio Tools for Docker To add Docker Support in Visual Studio 2017
· VSTS account with accesses to manage Repository, Build, Release and Test
· Azure subscription to deploy and run Docker image in Ubuntu Docker VM Container from Azure Container Registry (ACR)
VSTS Git Repository
· Step 1 Create a new Repository in VSTS – Click on Repos->new Repository as mentioned in the below screen:-
· Step 2 Clone and connect with the VSTS Repository in Visual Studio as mentioned in the below screen:-
Step 3 Create a local Git branch to manage code in Visual Studio as mentioned in the below screen:-
· Step 4 Modify and check-in code in VSTS local branch repository as mentioned in the below screen:-
Step 5 Pull Request in VSTS local repository to merge code with master branch as mentioned in the below screen:-
Step 6 Send the newly created Pull request for approval as mentioned in the below screen:-
· Step 7 install support for Docker by right-clicking the project and choosing Add > Docker Support. You should now see that the Run drop down has an option for Docker:
With Docker selected and Docker for Windows running (with Shared Drives enabled!) you will now be running and debugging the application in a Linux container.
Continuous Delivery with Containers – Use Visual Studio Team Services and Docker to Build and Deploy ASP.NET Core to Linux (QA and Production Environment)
· Provision a Linux Build VM to Run Application in a QA Docker Container
In order to build the project in VSTS we'll need a build machine. We'll provision this machine in Azure using the Azure driver for Docker Machine which offers a very neat way for provisioning a Linux VM with Docker installed in Azure.
To complete the following steps you'll need the Subscription ID of the Azure subscription you intend to use which you can get from the Azure portal.
1. At a bash command prompt enter the following command:
docker-machine create -d azure --azure-subscription-id 1fed30800-d2e6-491d-a37f-34d69aa8rt23 --azure-static-public-ip --azure-open-port 80 --azure-resource-group TenantPortalAPI-Dev-rg --azure-location southeastasia vstsdeployvmqa
By default this will create a Standard A2 VM running Ubuntu called vstsdeployvmqa (note that "Container names must be 3-63 characters in length and may contain only lower-case alphanumeric characters and hyphen. Hyphen must be preceded and followed by an alphanumeric character.") in a resource group called TenantPortalAPI-Dev-rg in the South East Asia data center (make sure you use your own Azure Subscription ID).In particular I've added the option for the VM to be created with a static public IP address as without that there's the possibility of certificate problems when the VM is shut down and restarted with a different IP address.
2. Azure now wants you to authenticate. The procedure is explained in the output of the command window, and requires you to visit https://aka.ms/devicelogin and enter the one-time code: Docker Machine will then create the VM in Azure and configure it with Docker and also generate certificates at C:\Users\<yourname>\.docker\machine. Do have a look at the sub folders of this path as some of the files are needed later on and it will also help to understand how connections to the VM are handled.
3. If you want to run Docker commands from the current command prompt against the Docker Engine running on the new VM you'll need to configure the bash shell by first running docker-machine env vstsdeployvmqa. This will print out the environment variables that need setting and the command (@FOR /f "tokens=*" %i IN (‘docker-machine env vstsdeployvmqa') DO @%I) to set them. These settings only persist for the life of the command prompt window so if you close it you'll need to repeat the process.
4. In order to connect to VM you need to connect to it using the docker-machine ssh vstsdeployvmqa command. Always set the DNS name for the server in azure VM so that you can use a fixed host name for the VM rather than an IP address.
5. With a connection made to the VM you need to issue the following commands to get it configured with the components to build an ASP.NET Core application:
a. Upgrade the VM with sudo apt-get update && sudo apt-get dist-upgrade.
b. Install .NET Core following the instructions here, making sure to use the instructions for Ubuntu 16.04.
c. Install npm with sudo apt -y install npm.
d. Install Bower with sudo npm install -g bower.
6. In order to start docker container use command – docker start <ContainerName>
7. In order to view docker images use command – docker images
8. In order to view docker machines running use command – docker-machine ls
9. In order to stop docker container use command – docker stop <ContainerName>
10. In order to view docker containers list with status use command – docker ps –a
11. In order to delete docker image use command – docker rmi <imageId>
12. In order to remove docker permission denied error use command - sudo usermod -a -G docker $USER
13. In order to log out docker machine use command – exit
· Provision a Linux VM to Run Application in Docker Container in production environment
Next we need a Linux VM we can deploy to azure. Use the same syntax as for the build VM calling the machine vstsdeployproductionvm:
docker-machine create -d azure --azure-subscription-id 1fed30800-d2e6-491d-a37f-34d69aa8rt23 --azure-static-public-ip --azure-open-port 80 --azure-resource-group TenantPortalAPI-Dev-rg --azure-location southeastasia vstsdeployproductionvm
· Configure the Docker VSTS Docker Host endpoints for QA build and Production Server
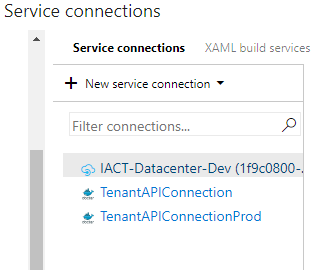
Next up is creating two service end points of the Docker Host type (i.e. our Linux build and deploy VMs). These are created by selecting Service Connections from the Project Settings icon and then New Service Connection drop down and then the Docker Host option:
To create a Docker Host endpoint:
1. Connection Name = TenantAPIConnection
2. Server URL = the DNS name of the Linux VM in the format tcp://your.dns.name:2376.
3. CA Certificate = contents of C:\Users\<yourname>\.docker\machine\machines\<yourvmname>\ca.pem.
4. Certificate = contents of C:\Users\<yourname>\.docker\machine\machines\<yourvmname>\cert.pem.
5. Key = contents of C:\Users\<yourname>\.docker\machine\machines\<yourvmname>\key.pem.
The completed dialog (in this case for the QA build VM) should look similar to this:
Note: Repeat this process for the deploy production VM.
· Create Container Registry in Azure Resource Group to store the docker image as mentioned in the below screen:-
Note: After creating Container registry the URL should be like e.g. registrydcalh.azurecr.io
· Creating the Build Pipeline in VSTS
Step 1 - From the VSTS Builds option create a new build definition based on an Empty Job template.
Step 2 – Select Repository Source and choose the repository e.g. TenantPortalAPI.
Step 3 - Select Hosted VS2017 as the Default build agent Pipeline. The default agent will build the application artifacts and create a default zip package
Step 4 - Check the Continuous integration box to enable auto build after the code is merged with master branch in Repository pipeline.
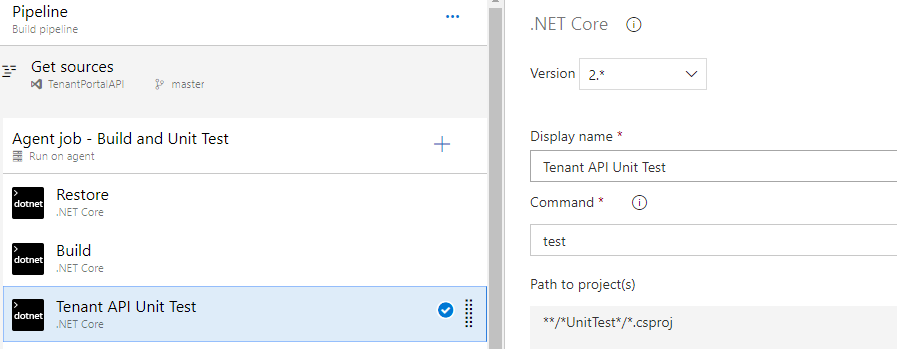
Step 5 - Add new Agent job using Pipeline->Add an agent job options. Give job name as Agent job - Build and Unit Test and choose Agent Pool as Hosted VS2017
Step 6 - In above Agent, Add new .Net Core Task by clicking the (+) button using Add a task to Agent job options. Give Task name as Restore and save. This Task will restore the .csproj file extension from the repository for build purpose.
Step 7 - Enter the below details into Task and Save.
Step 8 - Add a new .Net Core Task by clicking the (+) button using Add a task to Agent job options. Give Task name as Build and save. This Task will build the .csproj file extension from the repository.
Step 9 - Add a new .Net Core Task by clicking the (+) button using Add a task to Agent job options. Give Task name as Tenant API Unit Test and save. This Task will run the unit test using project path as **/*UnitTest*/*.csproj from the repository.
Step 10 - Add a new .Net Core Task by clicking the (+) button using Add a task to Agent job options. Give Task name as Publish and save. This Task will publish the API tenant project from the build path and output the same into build.artifactstagingdirectory folder.
Step 11 - Add a new .Net Core Task by clicking the (+) button using Add a task to Agent job options. Give Task name as Publish Artifact and save. This Task will publish and create the API tenant project artifacts zip into drop location folder.
Step 12 - Add new Agent job using Pipeline->Add an agent job options. Give job name as Agent job – Docker Image and choose Agent Pool as Hosted Ubuntu 1604.
Step 13 - In above Agent, Add new Docker Task by clicking the (+) button using Add a task to Agent job options. Give Task name as Build an image for Linux Docker Container and save. This Task will build a Docker image from the repository based upon default image name.
Step 14 - Add new Docker Task by clicking the (+) button using Add a task to Agent job options. Give Task name as Push an image to Azure Container Registry and save. This Task will publish newly built Docker image into Azure Container Registry.
In my next blog part 2 I will post details for creating the Release Pipeline in VSTS using Git and Docker command and task.


Comments